
Installing Composite Decking Edging: The Complete Australian Guide for a Professional Finish
- info512916
- Jun 7
- 12 min read
What if the difference between a high-end architectural masterpiece and a project that feels "unfinished" comes down to just the last few millimetres of your deck? Most homeowners spend weeks obsessing over board colours and subframe stability, only to feel a pang of disappointment when they notice raw board ends or a wobbly stair nosing. It's a common frustration in the Australian sun, where intense UV and heat can quickly turn a tight joint into an unsightly gap. Mastering the art of installing composite decking edging is the final, vital step in protecting your investment and ensuring your outdoor space looks as good in five years as it does on day one.
We understand that achieving a flush, professional perimeter requires more than just a few screws; it demands an understanding of how materials behave in our unique climate. This guide provides the technical clarity you need to finish your project with confidence. We'll clarify the confusion between fascia and edge boards while providing clear, practical steps for a secure finish. You'll learn how to choose the right accessories for a long-lasting, safe result on every corner and staircase. Let's transform your deck into a polished, enduring feature of your home.
Key Takeaways
Understand the distinct roles of fascia, nosing, and edge boards to ensure your deck perimeter is both structurally sound and visually seamless.
Master the technical requirements for installing composite decking edging by calculating thermal expansion gaps specifically for the Australian climate.
Learn the "measure twice, cut once" rule for achieving perfect 45-degree mitre joins and a flush, architectural finish on every corner.
Discover how to correctly extend your subframe to provide stable, long-term support for perimeter boards and high-traffic stair nosing.
Identify the ideal finishing accessories for the Ressisto and Riviera collections to maintain a consistent, premium aesthetic across your entire outdoor space.
Table of Contents
Understanding Composite Decking Edging and Nosing
Edging is the architectural signature of a well-built deck. While the main boards provide the platform, the edging provides the final, polished finish. Wood-plastic composites (WPCs) are engineered specifically to handle the harsh UV cycles and temperature fluctuations of the Australian climate. Unlike traditional timber, which often checks, warps, or splinters under the intense Melbourne sun, composite edging maintains its profile and colour for years. This steadfast reliability is why more homeowners are moving away from high-maintenance wood.
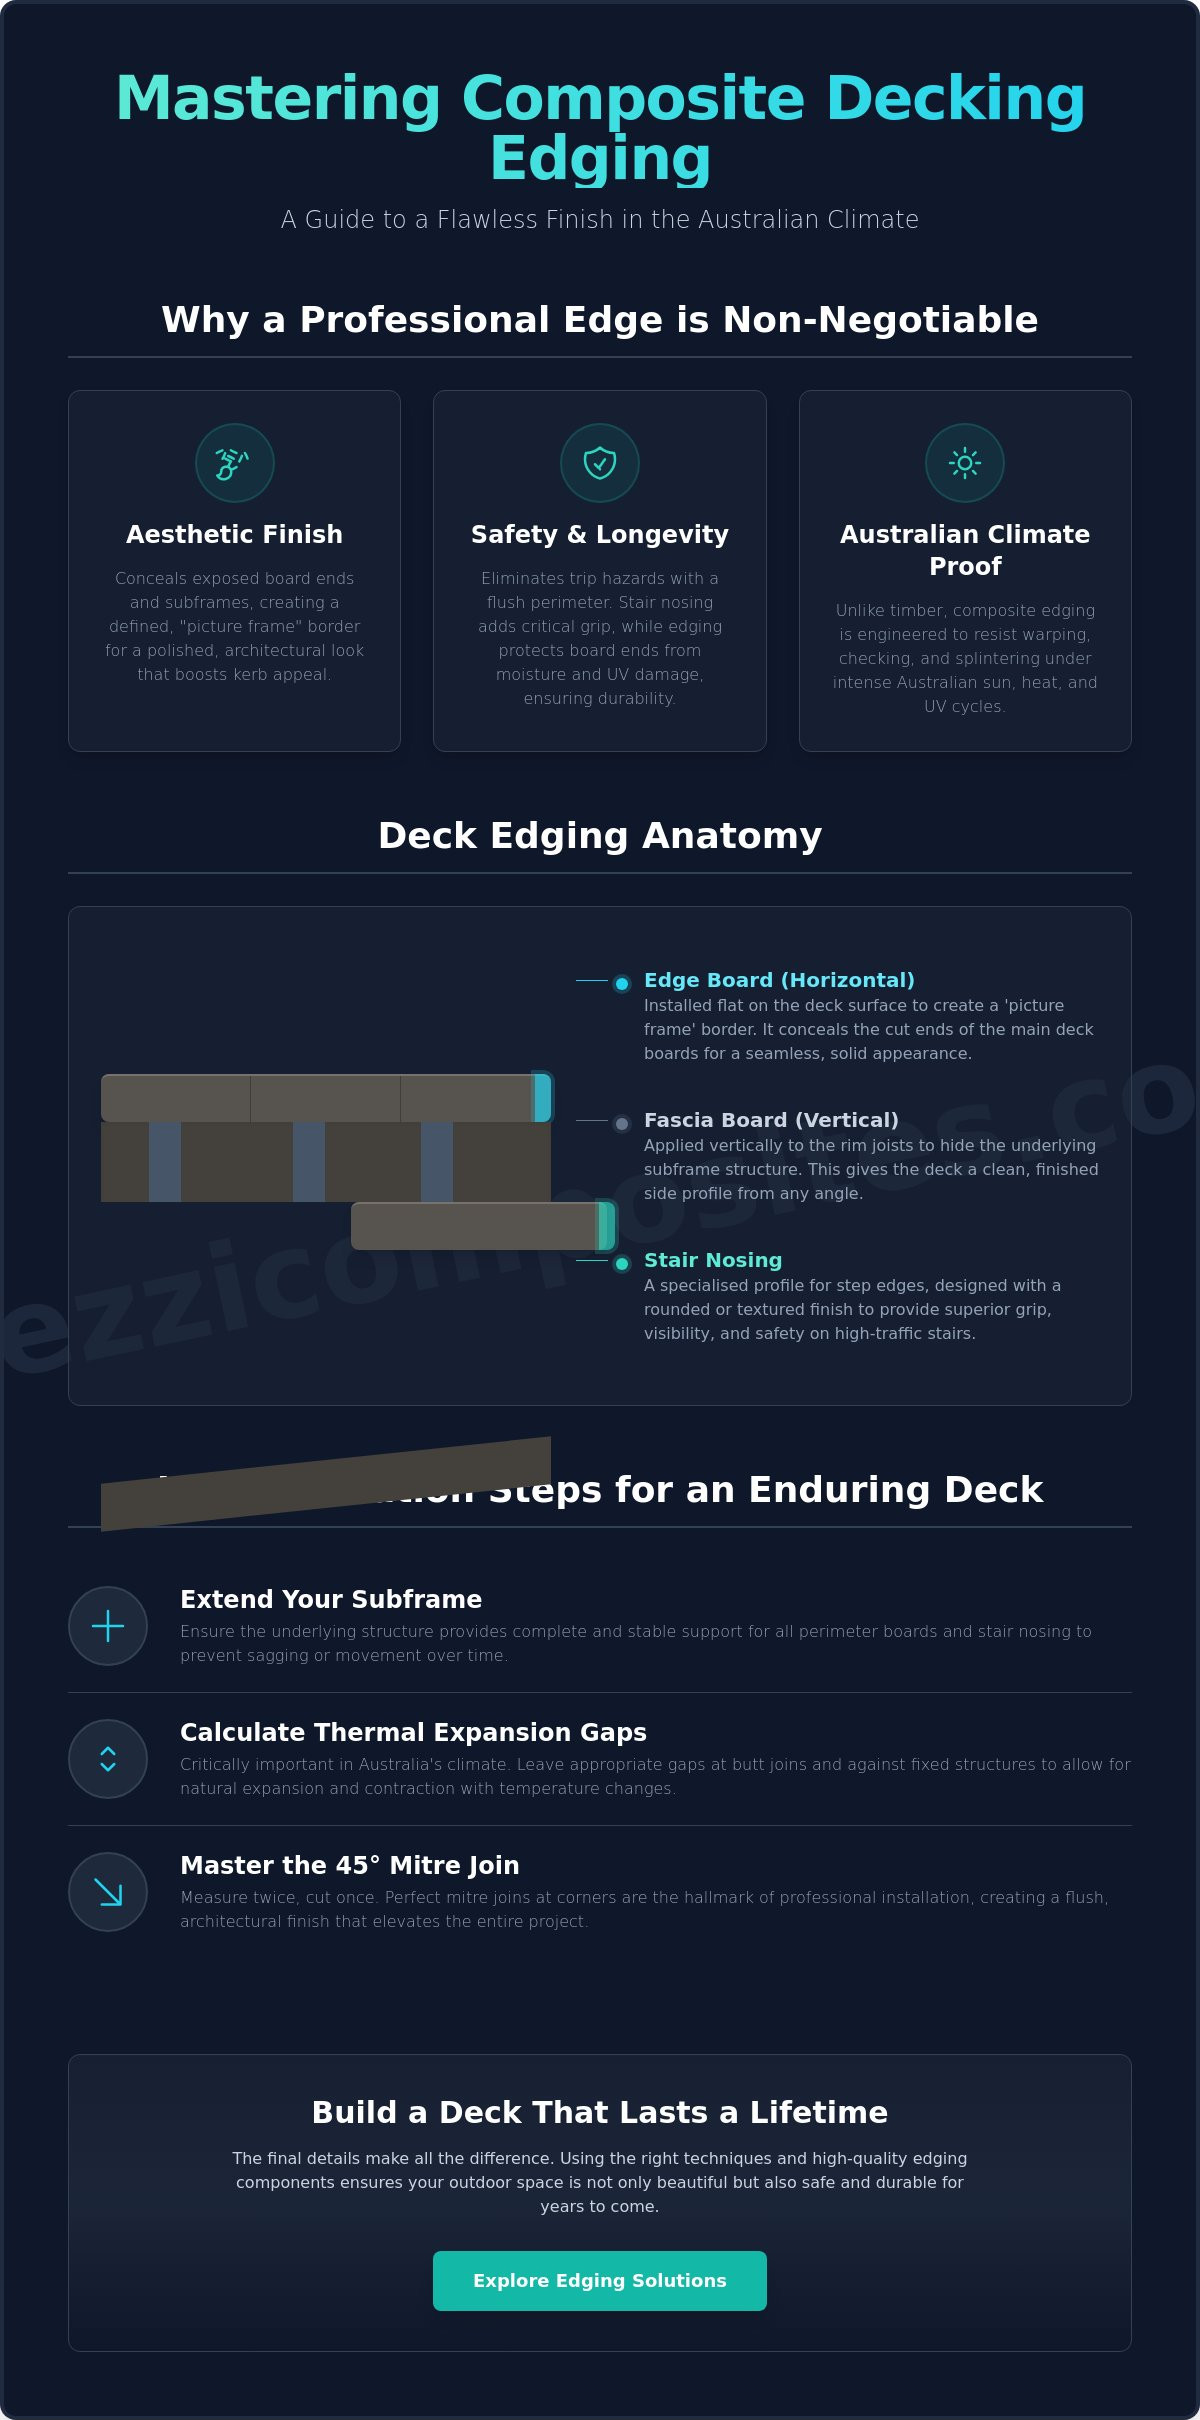
When you are installing composite decking edging, you are essentially creating a protective barrier for the entire structure. It is vital to understand the structural difference between your options. A fascia board typically sits vertically against the rim joist to hide the underlying subframe. A dedicated edge board, however, sits horizontally on the deck surface, often used to create a "picture frame" perimeter. Properly installing composite decking edging is the most effective way to protect the most vulnerable points of your deck while ensuring it looks grounded and professionally executed.
The Aesthetic Purpose of Edging
Many composite boards feature a honeycomb or solid core that is visible at the cut ends. Without proper edging, these internal structures remain exposed, which can make a premium project look unfinished. By utilising Ressisto Nosing & Edging Options, you can conceal these ends and create a defined border that organises the outdoor space into distinct living zones. Whether you choose a matching colour for a seamless flow or a contrasting tone to highlight steps and edges, the result is a sophisticated finish that adds genuine kerb appeal to your property.
Safety and Longevity Benefits
Beyond the visual appeal, professional edging acts as a critical safety feature. It provides a stable, flush perimeter that helps eliminate trip hazards, particularly on stairs where a dedicated nosing is required for grip and visibility. In our local context, moisture management remains a priority. Edging protects board ends from direct exposure to the elements, which prevents issues like delamination or moisture ingress. For any Melbourne property, this meticulous attention to detail doesn't just improve safety. It secures the longevity of the deck and increases the overall value of the home by demonstrating a commitment to quality and long-term performance.
Types of Edging: Nosing vs. Fascia vs. Edge Boards
When you're installing composite decking edging, selecting the correct profile is a decision that balances aesthetics with safety. While many homeowners use these terms interchangeably, fascia, nosing, and edge boards each serve a specific purpose in your deck's anatomy. Edge boards are typically installed horizontally to create a "picture frame" border. This defines the perimeter and hides the ends of the field boards, giving the deck a solid, grounded appearance. Fascia boards, on the other hand, are applied vertically to cover the timber joists and subframe. For those seeking a truly professional finish, understanding these distinctions is the first step toward a result that looks deliberate rather than accidental.
Choosing between these options often depends on the height of your deck and the complexity of your stairs. A low-level deck might only require a simple edge board to finish the perimeter. However, any project involving elevation or multiple levels will need a combination of all three. Properly installing composite decking edging ensures that every transition, from the main floor to the garden path, is secure and visually consistent.
Composite Deck Stair Nosing
Safety is non-negotiable on any Australian property. Stair nosing features a rounded or specifically textured profile designed to provide extra grip and better visibility on step edges. This is particularly important for family homes where high traffic is a daily reality. To comply with Australian building standards regarding slip resistance and structural integrity, you must ensure your nosing is installed with the correct overhang and fastening. When paired with a premium product like the Riviera 190 Wide Board, a dedicated nosing creates a luxury, seamless transition between levels that simple edge boards cannot replicate.
Fascia Boards and Skirting
Fascia acts as the "skirting" for your outdoor room. It conceals the "ugly" bits of the treated pine subframe that would otherwise be visible from the garden or lawn. Whether you choose a vertical application to match a modern Melbourne facade or a horizontal wrap, ventilation is key. You must leave a small gap between the fascia and the subframe to allow for airflow. This prevents moisture from being trapped against the joists, which could lead to timber rot over time. If you're unsure which profile best suits your layout, you can explore our range of Ressisto Nosing & Edging Options to find the perfect match for your boards.
Planning for the Australian Climate: Expansion and Gaps
Designing a deck that survives the Melbourne summer requires a deep respect for thermal dynamics. Composite materials, while incredibly durable, are subject to linear expansion and contraction as temperatures swing. When you are installing composite decking edging, you must account for this movement with surgical precision. Unlike the main surface boards, which have consistent gaps along their length, edging often involves complex mitred corners where two boards meet at a 45-degree angle. If these joins are too tight, the boards will have nowhere to go during a 40-degree heatwave, potentially leading to buckling or warped perimeters.
Precision is paramount. Cutting these sections requires a high-quality mitre saw equipped with a fine-tooth, carbide-tipped blade to ensure clean, splinter-free edges. Standard butt joints in edging are less forgiving than those in field boards because they sit at the very eye-level of the project. A gap that looks perfect at 7:00 AM in the shade might look significantly different by mid-afternoon. This is why research on WPC durability emphasises the need for climate-specific installation techniques to maintain the structural integrity of the material over its lifespan.
Thermal Movement Calculations
The golden rule for installing composite decking edging is to set your gaps based on the ambient temperature during the installation. If you are working on a scorching afternoon, your boards are likely at their maximum expansion; you can set them closer together. Conversely, if you are working in the crisp morning air, you must leave a more generous gap to allow for future expansion. We recommend "double joisting" at every edging intersection. By providing a wider timber base for the boards to sit on, you ensure that both ends of the join are fully supported, reducing the risk of the boards lifting or shifting as they move.
Pre-Installation Checklist
Success begins before the first cut is made. Always acclimatise your Ressisto boards by laying them flat at the installation site for at least 48 hours. This allows the material to reach a stable temperature and humidity level consistent with your local environment. You should also verify the levelness of your subframe one final time. Edging acts as a visual straightedge; even a minor dip in the joists will be magnified once the perimeter is fixed. For a complete overview of the fasteners and tools required for a professional finish, consult our Essential Guide to Composite Decking Accessories to ensure your clips and screws are fully compatible with your chosen boards.
Step-by-Step: Installing Composite Decking Edging
Before you pick up the saw, ensure your timber subframe provides a wide enough landing for your perimeter boards. This often requires adding extra blocking or "noggins" between the joists to support the wider footprint of an edge board or nosing profile. A secure subframe is the only way to guarantee that your edging won't sag or bounce underfoot over time. When installing composite decking edging, the quality of your foundation determines the quality of your finish. If the subframe isn't extended correctly, you'll find it impossible to achieve the flush, professional perimeter you're aiming for.
Precision is your best friend during this phase. The "measure twice, cut once" rule is never more relevant than when you're working with 45-degree mitre joins. Unlike standard board ends that might be hidden by a wall, these corners are the most visible part of your deck. Take your time to dry-fit every piece before applying any fasteners. This allows you to check the alignment and ensure the gaps are consistent across the entire perimeter. Properly installing composite decking edging requires a patient, methodical approach that prioritises accuracy over speed.
The Mitre Joint Masterclass
Tight mitres are the hallmark of a master builder. To achieve this, cut your 45-degree angles slightly "long" and shave them back millimetre by millimetre for a perfect fit. While some builders use adhesive in the joints, we recommend relying on mechanical fixings to allow for the thermal movement discussed in the previous section. Adhesive can often crack or fail as the boards expand and contract in the sun. A light sand with 60-grit paper on the cut ends will remove any burrs, leaving a premium, splinter-free finish that feels smooth to the touch.
Securing the Perimeter
Unlike the main deck surface, which often uses hidden clips, edging usually requires face-fixing for maximum stability. This means screws will be visible, so your placement strategy must be intentional and uniform. Pre-drilling is essential. Without a pilot hole, the dense composite core can split or "mushroom" around the screw head, ruining the look of the board. Maintain a consistent distance of 20mm to 30mm from the edge for a clean, industrial look. For a truly cohesive exterior, many homeowners choose to match their deck edging with Architectural Composite Cladding on nearby walls or garden features to create a unified design language.
You can browse our full range of Decking Accessories to find the exact colour-matched screws and fasteners required for a "disappearing" look on your corners.
Choosing the Right Finish: Ressisto and Riviera Options
The final phase of your project involves selecting a profile that complements your chosen board texture while standing up to the local environment. Whether you've opted for the tactile feel of the Decking Ressisto 143 Brushed series or the understated elegance of the 138 Extra Matte, your edging must match both the colour and the grain. When installing composite decking edging, using genuine Ressisto Nosing & Edging Options ensures a seamless transition. These accessories are engineered with the same UV-stable capping as the main boards, which is essential for decks exposed to the harsh, direct light of a north-facing Melbourne backyard. Consistency is key.
If your design utilises the Decking Riviera 190 Wide Board, you'll need to pay closer attention to your nosing choice. The scale of a 190mm wide board creates a bold architectural statement, but it requires a robust edging profile that can handle the increased surface area and potential for thermal movement. In Victoria’s coastal regions, where salt spray is a factor, or in the dry heat of the inland plains, the durability of Paveezzi Composites accessories provides the peace of mind that your perimeter won't degrade. A final inspection should confirm that all gaps are consistent and that the edging doesn't impede the deck's natural drainage path.
Material Selection for Longevity
Selecting the right finish is about more than just looks. The brushed texture of the 143 series offers excellent slip resistance, making it ideal for pool surrounds, while the 138 Extra Matte provides a sophisticated, modern aesthetic that hides minor scuffs effectively. By installing composite decking edging from the same product family, you maintain the integrity of the design and ensure the entire structure ages at the same rate. This meticulous attention to detail is what separates a standard DIY effort from a professional, high-value installation.
Next Steps for Your Project
We recommend ordering samples to see how the different finishes react to the specific light conditions at your home. The way a board looks under a showroom light can differ significantly from how it appears in the dappled shade of a Victorian garden. Once you've finalised your selection, consider engaging a local Melbourne installer who is experienced with Paveezzi Composites systems to ensure the technical expansion requirements are met. For ongoing care, a simple wash with soapy water and a soft brush will keep your edging looking pristine. Avoid using harsh chemicals or pressure washers at close range, as these can disturb the finish of your composite boards.
Secure a Professional Finish for Your Outdoor Space
Achieving a flush, architectural perimeter is the final step in transforming a standard deck into a high-end outdoor living zone. By mastering the technical requirements for installing composite decking edging, you ensure your project remains stable and visually striking through every Melbourne summer. Successful edging relies on the precision we've discussed; from thermal expansion calculations to the selection of safety-critical profiles like dedicated stair nosing. These details protect your investment and guarantee a perimeter that feels as solid as it looks.
As a specialist Australian supplier since 2010, Paveezzi Composites brings the quiet confidence of a Melbourne-based family business to every project. Our architectural grade Ressisto and Riviera collections are engineered specifically for our local climate, providing a steadfast reliability that traditional timber cannot match. We take pride in helping you solve the practical challenges of construction with high-performance materials that stand the test of time.
Explore the Ressisto Nosing & Edging range for your next project and discover the difference that precision-engineered accessories can make. Your vision for a polished, enduring outdoor space is well within reach.
Frequently Asked Questions
Do I really need a dedicated edge board, or can I just use a standard deck board?
While a standard board is functional, a dedicated edge board is superior for concealing the internal core of the material. Most standard boards feature side grooves designed for hidden fasteners, which look unsightly when exposed on a perimeter. A solid edge board provides a clean, square finish that creates a professional "picture frame" effect. It is the most effective way to ensure your deck looks deliberate and polished from every angle.
How much of an expansion gap should I leave at the mitred corners?
You should typically leave a gap of 3mm to 5mm at mitred corners, though this depends on the ambient temperature during your project. When installing composite decking edging on a cold morning, a wider gap is necessary to allow for summer expansion. If you're working on a hot afternoon, the boards are already expanded, so a tighter gap is acceptable. Precision here prevents the boards from buckling in the heat.
Can I use a standard wood saw to cut composite edging and nosing?
You can use a standard power saw, but the blade choice is critical for a clean finish. A fine-tooth, carbide-tipped blade with 60 to 80 teeth is required to prevent splintering and melting of the composite material. Coarser blades designed for framing timber will tear the edges, leaving a rough surface that is difficult to sand smooth. Always use a sharp blade to ensure your mitre joins remain crisp and tight.
Is it better to screw through the face of the edging or use hidden clips?
Face-fixing is the most reliable method for the perimeter of your deck. While hidden clips work well for the main field, installing composite decking edging with colour-matched screws provides the lateral stability needed at the boundaries. Pre-drilling is essential to prevent the material from "mushrooming" around the screw head. This technique ensures the boards remain perfectly aligned even as they react to the intense Australian sun over many years.
How do I stop my stair nosing from becoming slippery when wet?
Selecting a profile with a high slip-resistance rating, such as the Ressisto 143 Brushed series, is the best starting point. These boards are engineered with a textured surface that provides superior grip underfoot. You should also ensure your deck is built with a slight fall to prevent water from pooling on the steps. Regular cleaning to remove algae or organic debris will further maintain the safety and traction of your stair nosing.
What is the best way to hide the subframe if my deck is raised?
A vertical fascia board is the most effective solution for concealing a raised timber subframe. It acts as a protective skirt that hides the treated pine joists while providing a cohesive look that matches your deck surface. You must leave a small ventilation gap between the fascia and the ground. This allows vital airflow to reach the timber subframe, which helps prevent moisture build-up and rot in our variable climate.
Should I glue the mitre joints on my composite deck edging?
We don't recommend gluing mitre joints because composite boards must be allowed to expand and contract independently. Adhesives are often too rigid to handle this thermal movement, which can lead to the glue cracking or the boards warping as they pull against the bond. Mechanical fasteners provide the necessary strength while allowing the material to breathe. Relying on proper joist support and correct gapping is a much more reliable long-term strategy.
How do I choose between a fascia board and a bullnose edging profile?
Choose a fascia board for vertical applications where you need to cover the side of the subframe. A bullnose profile is a horizontal finishing board with a rounded edge, making it the ideal choice for stair treads and perimeters where safety and comfort are priorities. Paveezzi Composites provides specific profiles for both applications, ensuring your deck meets architectural standards while providing the long-term performance required for the Victorian climate.


Comments